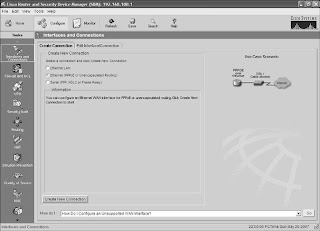
Having a router interface get an IP address from a DHCP server is often used when you are connecting your router to a Digital Subscriber Line (DSL) or cable modem for access to the Internet. The IP address for the interface needs to come from your provider. As shown in Figure 29-36, start in the Configure screen of SDM, and click the Interfaces and Connections button on the category bar. Select the connection named Ethernet (PPPoE or Unencapsulated Routing), and then click the Create New Connection button at the bottom of the screen. The Ethernet WAN Configuration Wizard will pop up, as shown inFigure 29-37. Click the Next button to begin.

The next screen of the wizard, shown in Figure 29-38, asks whether you need to configure the router as a Point-to-Point Protocol over Ethernet (PPPoE) client. Check with your Internet service provider (ISP) to determine whether you need this.
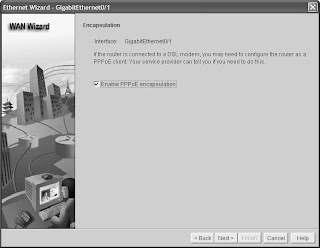

Figure 29-40 shows the next screen of the wizard: Authentication. Enter the appropriate information as provided by your ISP. Click Next when you have finished.

 The Interfaces and Connections screen has a tab named Edit Interface Connection. By clicking on this, you will see all interfaces on your router. Select the interface that you chose to make a DHCP client (assume it is GigabitEthernet 0/1 for this example), and then click the Test Connection button, as shown in Figure 29-42. Clicking the Start button begins a series of tests to determine whether the interface is working, as shown in Figure 29-43.
Figure 29-42 Connectivity Testing and Troubleshooting

Figure 29-43 Test Connection Successful

Using SDM to Configure NAT/PAT
From the Configure screen of SDM, click the NAT button on the category bar, as shown in Figure 29-44. You have two options: Basic or Advanced NAT. Make your selection, and then click the Launch the selected task button to begin configuration. The NAT Wizard then appears on the screen, as shown in Figure 29-45. Click Next to begin the wizard.
Figure 29-44 NAT

Figure 29-45 NAT Wizard
 The next screen in the wizard, shown in Figure 29-46, allows you to choose the interface that connects to the Internet—the outside interface. For this example, the GigabitEthernet 0/1 interface is connected to the Internet. You also choose your range of IP addresses that will be translated—your inside interfaces. For this example, choose the addresses that are connected to the Internal LAN—GigabitEthernet 0/0 for this example. Click Next when finished.
Figure 29-46 Sharing the Internet Connection
 Figure 29-47 shows the summary of the configuration that you will deliver to the router. If this is correct, click Finish; otherwise, click Back to return to the previous screen and make your corrections.
Figure 29-47 Summary of the Configuration

Good luck for your studies........